
How to set up pickup and delivery for your restaurant
Choose where you deliver, what it costs, the minimum order and realistic prep times, so online orders arrive when you promised and still make money.
Direct orders cost you no marketplace commission, but only if they’re worth making. A delivery area that’s too wide, a fee that’s too low or a prep time the kitchen can’t hit turns a good order into a refund. This guide sets up pickup, delivery and prep times so every order is one you want.
All three live in Settings > Ordering & fulfillment.
Before you start
- Publish your menu. See How to set up your menu for online ordering.
- Check your restaurant address in Settings > General > Location details. Guests pick up from it, and distance-based delivery is measured from it.
Part 1: Pickup
Go to Settings > Ordering & fulfillment > Pickup.
- Turn on Enable pickup.
- Write Pickup instructions, such as “Ring the bell” or “Call before arrival”. Guests see them with their order.
- Under Pickup hours, set the days and times guests can pick up.
- Turn on Allow scheduled pickup if guests can choose a preferred pickup time.
- If big orders swamp your kitchen, turn on Enable large order limit, set Max items allowed and edit the Message when limit exceeded.
- Select Save changes.
Part 2: Delivery
Go to Settings > Ordering & fulfillment > Delivery.
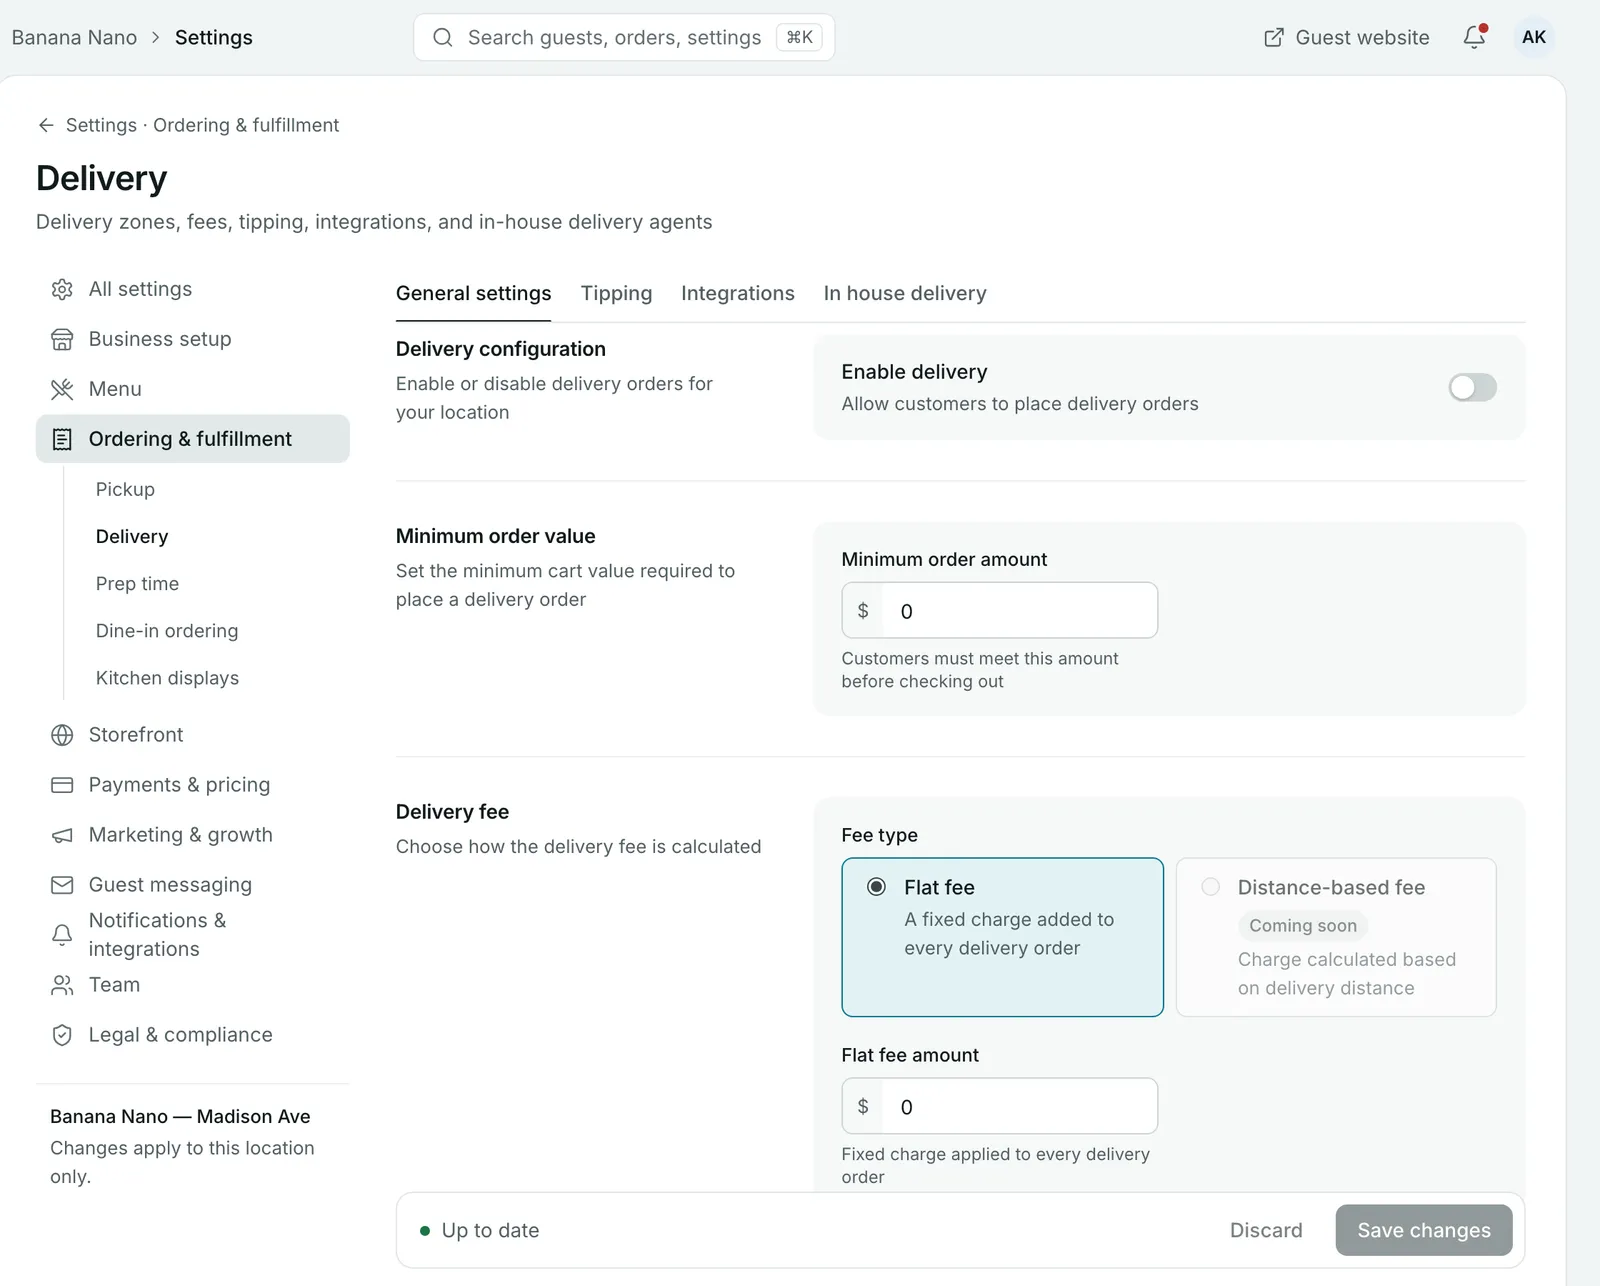
- Turn on Enable delivery.
- Set a Minimum order amount. Guests must reach it before they can check out.
- Choose a Fee type:
- Flat fee: the same charge on every delivery order.
- Distance-based fee: a charge based on how far the order travels.
- Set the Estimated time guests see for delivery.
- Choose a delivery Area type:
- Postcodes: deliver only to the postcodes you list, such as SW1A 1AA.
- Radius: deliver within a set distance of your restaurant, in kilometres or miles.
- Turn on Allow scheduled delivery if guests can choose a delivery time.
- Select Save changes.
To deliver with your own staff, turn on Enable in house delivery on the same page. See How to deliver orders with your own drivers.
Tip: Set your minimum order so a single delivery covers its own cost. A minimum that sits just above your most popular main makes guests add a side or a drink.
Part 3: Prep time
Go to Settings > Ordering & fulfillment > Prep time. Prep time is how long the kitchen needs for pickup and delivery orders.
- Set Standard prep time (minutes). It’s used whenever no rule applies.
- Set Maximum prep time (minutes). Rules can’t go above this cap.
- Under Dynamic prep time rules, add rules for orders that take longer:
- By order value: for example, 30 minutes for large orders.
- By item quantity: for example, 35 minutes for orders of eight items or more.
- By schedule (time-based): a longer time during your busiest hours.
- Turn each rule on or off as you need it, then select Save changes.
Check it as a guest
Select Guest website at the top of the admin and place a test order for pickup and one for delivery. Check the fees, the minimum and the times you’re quoted.
Common questions
Can I deliver only to certain postcodes?
Yes. In Delivery settings, set the Area type to Postcodes and add each postcode you deliver to. Or choose Radius to deliver within a set distance of your restaurant, in kilometres or miles.
Can I charge more for longer deliveries?
Yes. Under Delivery fee, choose Distance-based fee instead of Flat fee.
How do I stop huge pickup orders I can't make in time?
Turn on Enable large order limit in Pickup settings, set Max items allowed and write the message guests see when their order is too big.
Can guests order now for later?
Yes. Turn on Allow scheduled pickup and Allow scheduled delivery so guests can choose a preferred time.
How do I quote longer times when the kitchen is busy?
Add rules under Dynamic prep time rules in Prep time. Rules can raise the prep time by order value, by item quantity or at set times, and never go above your Maximum prep time cap.
Still stuck? Submit a ticket
Tell us what you're trying to do. We'll attach this guide to your ticket, so you don't have to explain it twice.